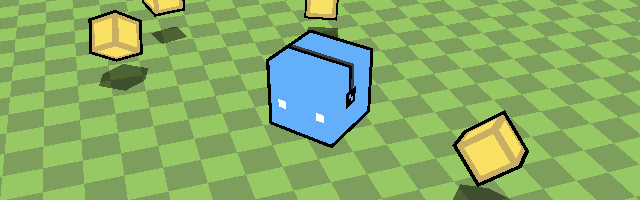
This rather cute-looking example demonstrates creation of 3d-person camera in GameMaker' 3d. And character rotation. And a few other things.
Descriptions and explanations following,
3rd-person camera
Surprisingly, I've seen that many people have problems with visualizing and writing code for this. Especially for rotatable camera. Indeed, it might seem that spinning camera along two directions would be hard (since a single pair of lengthdir_x/lengthdir_y/cos/sin will not cover it), but implementation is actually pretty simple: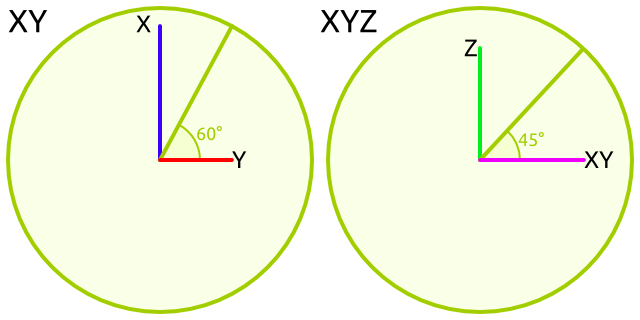
Left image displays, what originally goes in XY plane. I suppose that you know this one (if you've got to trying to do something in 3d). 1 point long vector coordinates can be found out via cos/sin operations.
On right image you can see how it goes if you add a second angle (and third axis), viewing from side (at -pan degrees). Previously seen XY vector is now flat and marked by magenta line. New angle (tilt) rotates it upwards, making the formula:
vx = cos(pan) * cos(tilt);
vy = sin(pan) * cos(tilt);
vz = sin(tilt);
Or, if you were to use lengthdir_ functions,
vx = lengthdir_x(lengthdir_x(1, pan), tilt)
vy = lengthdir_x(lengthdir_y(1, pan), tilt)
vz = lengthdir_y(1, tilt)
Once you have a vector, adjusting camera position and rotation goes simple:
d3d_set_projection(
	target.x + vx * distance,
	target.y + vy * distance,
	target.z + vz * distance,
	target.x, target.y, target.z,
	0, 0, 1)
(here, distance is a variable indicating distance from camera to target object)
Pseudio-Cel shading (outlines)
As of time of writing this post, GameMaker does not support shaders. Moreover in version 8.0, which I provide examples for (for sake of compatibility). However, if your game does not have that much polygons, there's an old trick for cel shading:- Turn the culling on
- Draw the model as normal
- Draw a slightly bigger, black-colored version of model with polygons facing inwards (in opposite direction, to be specific).
Shadows
This is another thing that you shouldn't be doing if you have high-poly models and that is done here due to absence of such (and ease of this method). If you've noticed, when you look at a model from above in 2D view, you essentially see the shape that would have been shadowed. So why not use that?A trick used for collectable objects here is that the shape is drawn a second time with transformation that flattens it completely (Z scale = 0) and puts it just on ground, making it look like shadow. For more complex models it is generally recommended that you bake shadows into surface(s) to avoid excessive drawing.
Simple 3d physics
Despite of looks, adding 3d movement is just as simple as adding 2d one. With a difference of using your own variable (normally z) which is modified and used for drawing. Here 3d jumping and character-floor collisions fit in just 6 lines:// Z movement: if (z > 0) zspeed -= 0.5 // accelerate downwards if in air z += zspeed if (z < 0) { // hit ground z = 0 zspeed = 0 } if ((z <= 0) && keyboard_check(vk_space)) zspeed = 5 // jumpingI'll try to separately cover 3d collisions in one of next posts.
thank you very much, I will surely credit you in my game.
Very good tutorial, the code is very clean and easy to understand!
I can do some very advanced things while sticking to 2d, but I’ve always had trouble getting into the Z axis and having cameras, especially in 3rd person.
Will definitely use this as a base.
Also, you even included easy shadow/”cel-shading” methods.
This makes all the difference in the world.
You’re freakin awesome :)
You should try making something with U3D, its much more powerful :)
I know of Ultimate3d and GMOgre.
A thing here is that these still aren’t as comfortable for use in my own projects (I mean, I’d rather pick an engine that has BSP calculations and other pleasant things, or at least doesn’t restrict my game to Windows), and aren’t as newbie-friendly or popular to require writing tutorials for them (though I may need to verify this – some time has passed).
Additionally, GameMaker: Studio’ 3d would improve in pleasantness a bit once shaders will be implemented (which is promised to be considerably soon).