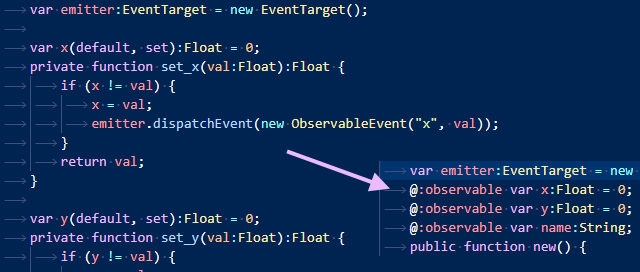
This is a little post about using Haxe's macro class {} reification syntax to make it easier to write macros that make it easier to write your code.
Let's suppose you'd like a class with "observable" fields on JS target, so that you can register event listeners and be notified when a field changes.
Generally this implies writing code like
public var x(default, set):Float = 0;
private function set_x(val:Float):Float {
	if (x != val) {
		x = val;
		emitter.dispatchEvent(new ObservableEvent(type, val));
	}
	return val;
}
but that's at least 8 lines per each field! And even more if you aren't a fan of 1TBS and/or want adequate spacing.
Surely, a perfect job for a macro.
From the cookbook examples you might already know that you can add/modify fields using macros, but did you know that you can have it far nicer than specifying a typedef for each field? That's where class reification comes in.
If you do
var tmp_class = macro class {
	public var x:Float;
}
tmp_class will be a haxe.macro.Expr.TypeDefinition.
While uses of TypeDefinition in macro API are a little situational (such as providing fallbacks for missing types or injecting entirely-generated types), it has fields, which are an Array<Field> - the same format that your @:build macro should return.
By combining it with expression reification, a little inline class can effectively be used as a template for generating fields.
And so you can make it generate the exact same field definitions as you would by hand:
import haxe.macro.Context;
import haxe.macro.Expr;
class Macro {
	public static macro function build(target:Expr):Array<Field> {
		var fields = Context.getBuildFields();
		for (field in fields.copy()) { // (copy fields so that we don't go over ones we add)
			// only apply to fields that have @:observable!
			var m = Lambda.find(field.meta, (m) -> m.name == ":observable");
			if (m == null) continue;
			// store field name, type, init:
			var fieldName = field.name;
			var fieldType, fieldExpr;
			switch (field.kind) {
				case FVar(type, expr):
					fieldType = type;
					fieldExpr = expr;
				default: continue;
			};
			// assemble a temporary class to nicely grab fields from:
			var setterName = "set_" + fieldName;
			var tmp_class = macro class {
				public var $fieldName(default, set):$fieldType = $fieldExpr;
				public function $setterName(v:$fieldType):$fieldType {
					if ($i{fieldName} != v) { // (field name as identifier)
						$i{fieldName} = v;
						$target.dispatchEvent(new ObservableEvent($v{fieldName}, v));
					}
					return v;
				}
			};
			for (mcf in tmp_class.fields) fields.push(mcf);
			fields.remove(field); // remove the original field
		}
		return fields;
	}
}
Which would then be used like so:
import js.html.CustomEvent;
import js.html.EventTarget;
import js.Browser.console;

@:build(Macro.build(emitter))
@:keep class Test {
	var emitter:EventTarget = new EventTarget();
	@:observable var x:Float = 0;
	@:observable var y:Float = 0;
	@:observable var name:String;

	public function new() { }

	public static inline function main() {
		var q = new Test();
		q.emitter.addEventListener("x", function(e:ObservableEvent<Float>) {
			console.log("x changed to", e.value);
		});
		q.emitter.addEventListener("y", function(e:ObservableEvent<Float>) {
			console.log("y changed to", e.value);
		});
		q.emitter.addEventListener("name", function(e:ObservableEvent<String>) {
			console.log("name changed to", e.value);
		});
		q.x += 2;
		q.name = "me!";
	}
}
abstract ObservableEvent<T>(CustomEvent) to CustomEvent {
	public var value(get, never):T;
	private inline function get_value() return this.detail;

	public function new(type:String, val:T) {
		this = new CustomEvent(type, { detail: val });
	}
}
And give you the following output:
x changed to 2
name changed to me!
That's all!
Neat. This will surely be useful for doing a MVVM like pattern.